


Tutorial: How to get Copic like results with Bic Mark Its (and sharpies too)
For this technique you will need:
Bic Mark It Permanent Markers (both regular and ultra fine point)
Sharpie Extra Fine Point Markers (should be in the same color family that you are using)
Brillance Graphic Black Ink Pad
Clear Embossing Powder
Embossing Liquid
Heat Gun
Image to stamp and card stock to stamp image
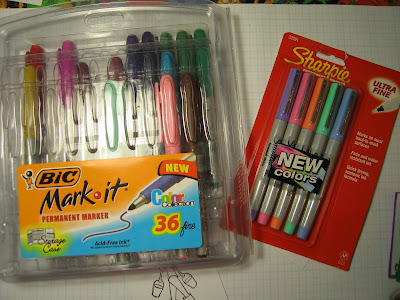
Here are the markers, I have a set of 36 Bics, but I understand they now have 12 additonal colors (which I will be buying soon : ) I have had the sharpies forever, they keep really well and come in 39 colors. Between the Sharpies and Bics you can get a whole range of colors, enough to give you the ability to color and shade your images. While I used the Bic markers for the main part of the coloring I would guess that the Sharpies would work as well for this whole project. I will try them as well at a later date and let you know how they work.
You can buy the Bic 36 set for $14.38 on Amazon, and if you purchase a few other things you get free shipping. I am sure you can find a local retailer that carries the Bics for a comparable price. The Sharpies are sometimes carried by Costco, but you can find them online as well, I found a good assortment of sets, priced well, on Amazon. One other note about the Sharpies, some of their pens come in dual tips, the Ultra Fine tip (great for outlining) and the fine tip (great for coloring).
Here is the image ready to go. I put some embossing liquid on the stamp, then stamped into the Brilliance Graphite Black, and then sprinkled clear embossing powder over the image, and then used the heat gun to set the powder. I emboss because I don't want the black to bleed when I am coloring. (In the near future I will research what ink pads won't bleed without having to emboss.) I also find the raised embossing makes it easier to stay in the lines when I am coloring.

Here I have laid out the blues that I am going to use, two Bic's and one sharpie. What I usually do is make a mark on paper with the pen to see how the color will turn out before coloring my image (you will see this in a later image.)

Then you will start coloring. I start with my lightest color. To get even coverage color in circles, the same as you would with Copics.
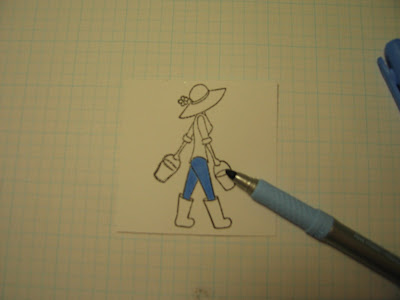
Then lay down your next color, here I am using a little darker blue to add shadow. Also note that I am only shading as if the sun were hiting her on the front, so the shading is on her backside, not any on the front of her pants or shirt. Also note that I laid down this color a bit wide, not quite half way, but not just on the image outline.
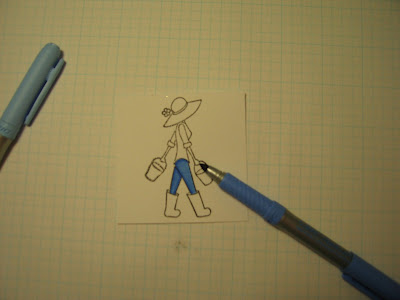
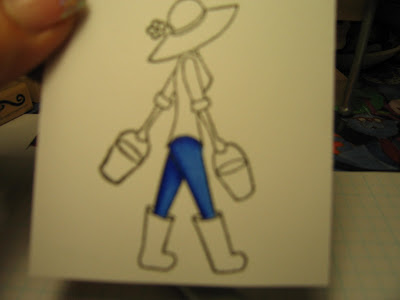
Don't worry at this point about harsh lines, after you lay down your last color you are going to go back over the part you just colored with your lightest color. The next picture (sorry it is blurry) is the addition of the darkets blue, in a very, very fine line.
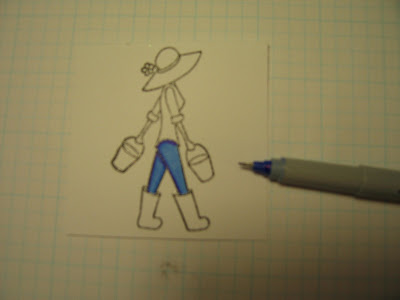
Yes, this one is blurry too, (sorry), but this is what the final part of the pants will look like after you have added all three blues and blended the colors out a bit. You get some really nice depth, and this method give a blend almost as good as a Copic!
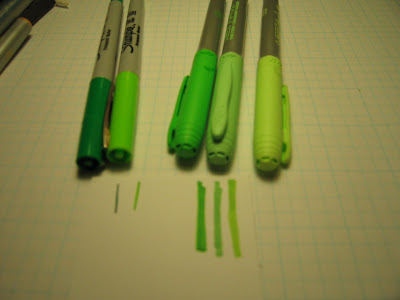
Below is an example of one of the ways I lay out the colors to see how they will look together. Either I draw lines like this or I have a scrap paper next to me and just color with the pens I want to use, seeing how they go together and seeing how they blend.
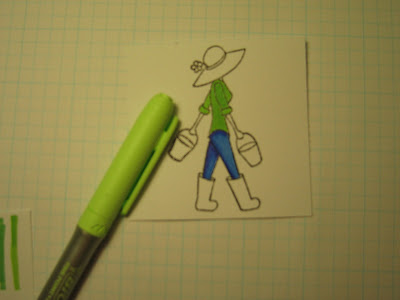
First layer of the shirt in green:
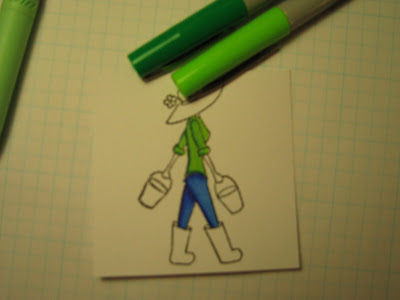
This is after I added the two sharpie greens and blended a bit:
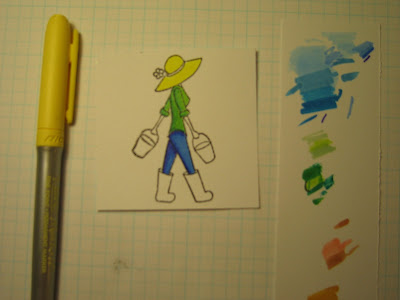
Working on the hat, it is hard to see the two yellows in this picture (you will see at the end that I added a little bit of tan to make the shading stand out more) Note the scrap paper on the side, that is how I test my colors and keep them next to me for reference, and to check to make sure I am using the right marker.
This picture shows the buckets finished and the boots being worked on. I used two shades of grey for the bucket and three shades of purple for the boots. This picture shows the boots before I blended them.

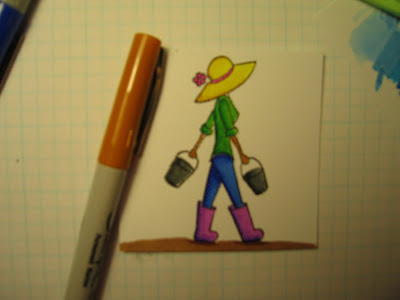
Here is where I decided that the hat need more shadow and I added the tan. Also I have colored in the ground below her boots, and added a little shadow underneath her feet.
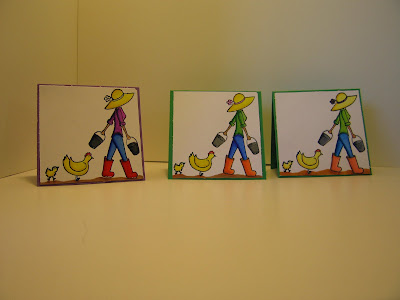
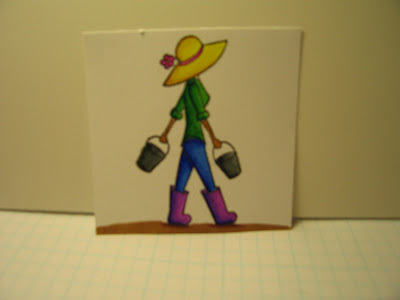
And here she is, already to be put on a card! I am not that great at using markers to color, and if I can get these results with these pens, anyone can do this!
Please let me know if you have any questions or comments. Also, if you try this and it works for you make sure to leave a comment and tell us what you liked/didn't like about this technique.
Have a wonderful day tomorrow. TGIF!
Bic Mark It Permanent Markers (both regular and ultra fine point)
Sharpie Extra Fine Point Markers (should be in the same color family that you are using)
Brillance Graphic Black Ink Pad
Clear Embossing Powder
Embossing Liquid
Heat Gun
Image to stamp and card stock to stamp image
Here are the markers, I have a set of 36 Bics, but I understand they now have 12 additonal colors (which I will be buying soon : ) I have had the sharpies forever, they keep really well and come in 39 colors. Between the Sharpies and Bics you can get a whole range of colors, enough to give you the ability to color and shade your images. While I used the Bic markers for the main part of the coloring I would guess that the Sharpies would work as well for this whole project. I will try them as well at a later date and let you know how they work.
You can buy the Bic 36 set for $14.38 on Amazon, and if you purchase a few other things you get free shipping. I am sure you can find a local retailer that carries the Bics for a comparable price. The Sharpies are sometimes carried by Costco, but you can find them online as well, I found a good assortment of sets, priced well, on Amazon. One other note about the Sharpies, some of their pens come in dual tips, the Ultra Fine tip (great for outlining) and the fine tip (great for coloring).
Here is the image ready to go. I put some embossing liquid on the stamp, then stamped into the Brilliance Graphite Black, and then sprinkled clear embossing powder over the image, and then used the heat gun to set the powder. I emboss because I don't want the black to bleed when I am coloring. (In the near future I will research what ink pads won't bleed without having to emboss.) I also find the raised embossing makes it easier to stay in the lines when I am coloring.
Here I have laid out the blues that I am going to use, two Bic's and one sharpie. What I usually do is make a mark on paper with the pen to see how the color will turn out before coloring my image (you will see this in a later image.)
Then you will start coloring. I start with my lightest color. To get even coverage color in circles, the same as you would with Copics.
Then lay down your next color, here I am using a little darker blue to add shadow. Also note that I am only shading as if the sun were hiting her on the front, so the shading is on her backside, not any on the front of her pants or shirt. Also note that I laid down this color a bit wide, not quite half way, but not just on the image outline.
Don't worry at this point about harsh lines, after you lay down your last color you are going to go back over the part you just colored with your lightest color. The next picture (sorry it is blurry) is the addition of the darkets blue, in a very, very fine line.
Yes, this one is blurry too, (sorry), but this is what the final part of the pants will look like after you have added all three blues and blended the colors out a bit. You get some really nice depth, and this method give a blend almost as good as a Copic!
Below is an example of one of the ways I lay out the colors to see how they will look together. Either I draw lines like this or I have a scrap paper next to me and just color with the pens I want to use, seeing how they go together and seeing how they blend.
First layer of the shirt in green:
This is after I added the two sharpie greens and blended a bit:
Working on the hat, it is hard to see the two yellows in this picture (you will see at the end that I added a little bit of tan to make the shading stand out more) Note the scrap paper on the side, that is how I test my colors and keep them next to me for reference, and to check to make sure I am using the right marker.
This picture shows the buckets finished and the boots being worked on. I used two shades of grey for the bucket and three shades of purple for the boots. This picture shows the boots before I blended them.
Here is where I decided that the hat need more shadow and I added the tan. Also I have colored in the ground below her boots, and added a little shadow underneath her feet.
And here she is, already to be put on a card! I am not that great at using markers to color, and if I can get these results with these pens, anyone can do this!
Please let me know if you have any questions or comments. Also, if you try this and it works for you make sure to leave a comment and tell us what you liked/didn't like about this technique.
Have a wonderful day tomorrow. TGIF!