


Tutorial: How to get Copic like results with Bic Mark Its (and sharpies too)
For this technique you will need:
Bic Mark It Permanent Markers (both regular and ultra fine point)
Sharpie Extra Fine Point Markers (should be in the same color family that you are using)
Brillance Graphic Black Ink Pad
Clear Embossing Powder
Embossing Liquid
Heat Gun
Image to stamp and card stock to stamp image
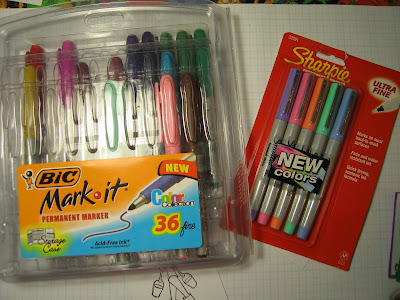
Here are the markers, I have a set of 36 Bics, but I understand they now have 12 additonal colors (which I will be buying soon : ) I have had the sharpies forever, they keep really well and come in 39 colors. Between the Sharpies and Bics you can get a whole range of colors, enough to give you the ability to color and shade your images. While I used the Bic markers for the main part of the coloring I would guess that the Sharpies would work as well for this whole project. I will try them as well at a later date and let you know how they work.
You can buy the Bic 36 set for $14.38 on Amazon, and if you purchase a few other things you get free shipping. I am sure you can find a local retailer that carries the Bics for a comparable price. The Sharpies are sometimes carried by Costco, but you can find them online as well, I found a good assortment of sets, priced well, on Amazon. One other note about the Sharpies, some of their pens come in dual tips, the Ultra Fine tip (great for outlining) and the fine tip (great for coloring).
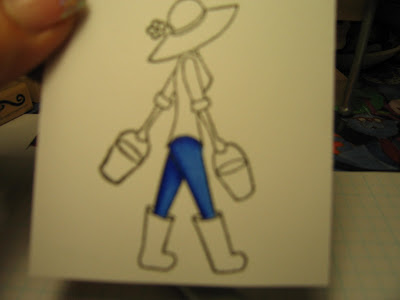
Here is the image ready to go. I put some embossing liquid on the stamp, then stamped into the Brilliance Graphite Black, and then sprinkled clear embossing powder over the image, and then used the heat gun to set the powder. I emboss because I don't want the black to bleed when I am coloring. (In the near future I will research what ink pads won't bleed without having to emboss.) I also find the raised embossing makes it easier to stay in the lines when I am coloring.

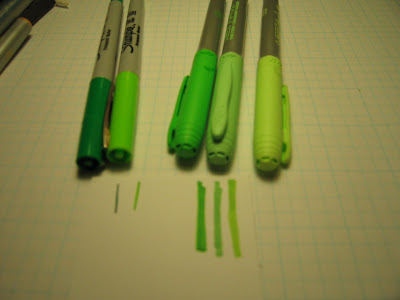
Here I have laid out the blues that I am going to use, two Bic's and one sharpie. What I usually do is make a mark on paper with the pen to see how the color will turn out before coloring my image (you will see this in a later image.)

Then you will start coloring. I start with my lightest color. To get even coverage color in circles, the same as you would with Copics.
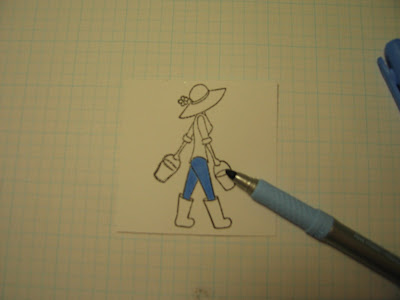
Then lay down your next color, here I am using a little darker blue to add shadow. Also note that I am only shading as if the sun were hiting her on the front, so the shading is on her backside, not any on the front of her pants or shirt. Also note that I laid down this color a bit wide, not quite half way, but not just on the image outline.
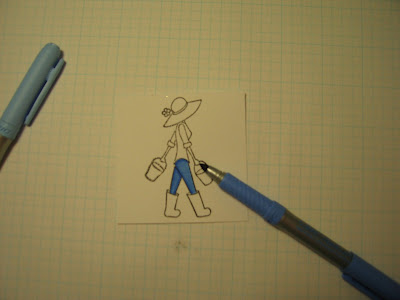
Don't worry at this point about harsh lines, after you lay down your last color you are going to go back over the part you just colored with your lightest color. The next picture (sorry it is blurry) is the addition of the darkets blue, in a very, very fine line.
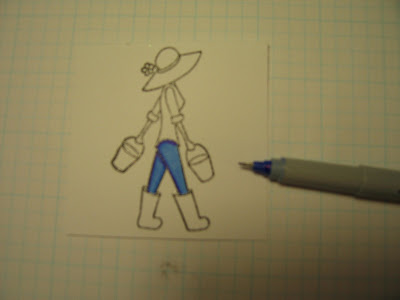
Yes, this one is blurry too, (sorry), but this is what the final part of the pants will look like after you have added all three blues and blended the colors out a bit. You get some really nice depth, and this method give a blend almost as good as a Copic!
Below is an example of one of the ways I lay out the colors to see how they will look together. Either I draw lines like this or I have a scrap paper next to me and just color with the pens I want to use, seeing how they go together and seeing how they blend.
First layer of the shirt in green:
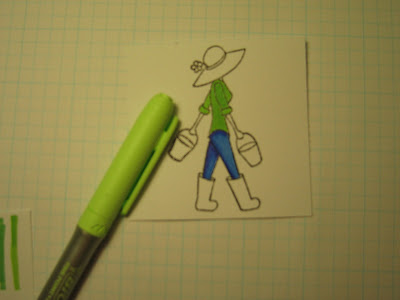
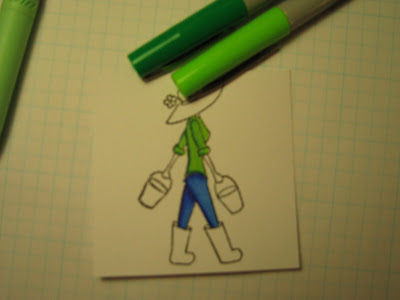
This is after I added the two sharpie greens and blended a bit:
Working on the hat, it is hard to see the two yellows in this picture (you will see at the end that I added a little bit of tan to make the shading stand out more) Note the scrap paper on the side, that is how I test my colors and keep them next to me for reference, and to check to make sure I am using the right marker.
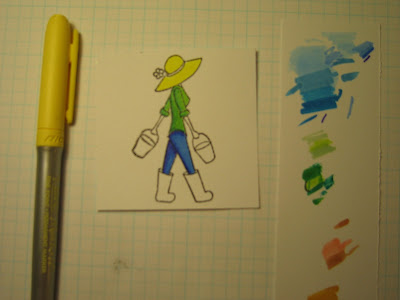
This picture shows the buckets finished and the boots being worked on. I used two shades of grey for the bucket and three shades of purple for the boots. This picture shows the boots before I blended them.

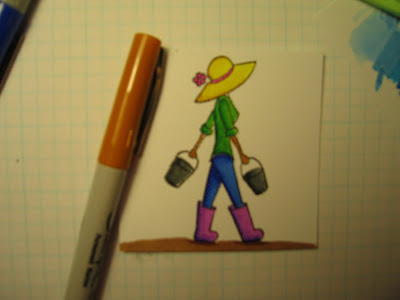
Here is where I decided that the hat need more shadow and I added the tan. Also I have colored in the ground below her boots, and added a little shadow underneath her feet.
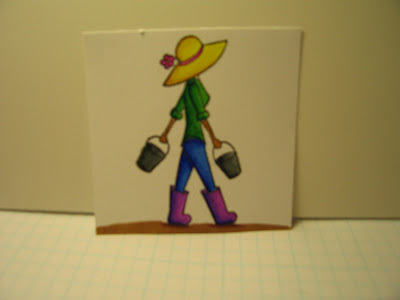
And here she is, already to be put on a card! I am not that great at using markers to color, and if I can get these results with these pens, anyone can do this!
Please let me know if you have any questions or comments. Also, if you try this and it works for you make sure to leave a comment and tell us what you liked/didn't like about this technique.
Have a wonderful day tomorrow. TGIF!
Bic Mark It Permanent Markers (both regular and ultra fine point)
Sharpie Extra Fine Point Markers (should be in the same color family that you are using)
Brillance Graphic Black Ink Pad
Clear Embossing Powder
Embossing Liquid
Heat Gun
Image to stamp and card stock to stamp image
Here are the markers, I have a set of 36 Bics, but I understand they now have 12 additonal colors (which I will be buying soon : ) I have had the sharpies forever, they keep really well and come in 39 colors. Between the Sharpies and Bics you can get a whole range of colors, enough to give you the ability to color and shade your images. While I used the Bic markers for the main part of the coloring I would guess that the Sharpies would work as well for this whole project. I will try them as well at a later date and let you know how they work.
You can buy the Bic 36 set for $14.38 on Amazon, and if you purchase a few other things you get free shipping. I am sure you can find a local retailer that carries the Bics for a comparable price. The Sharpies are sometimes carried by Costco, but you can find them online as well, I found a good assortment of sets, priced well, on Amazon. One other note about the Sharpies, some of their pens come in dual tips, the Ultra Fine tip (great for outlining) and the fine tip (great for coloring).
Here is the image ready to go. I put some embossing liquid on the stamp, then stamped into the Brilliance Graphite Black, and then sprinkled clear embossing powder over the image, and then used the heat gun to set the powder. I emboss because I don't want the black to bleed when I am coloring. (In the near future I will research what ink pads won't bleed without having to emboss.) I also find the raised embossing makes it easier to stay in the lines when I am coloring.
Here I have laid out the blues that I am going to use, two Bic's and one sharpie. What I usually do is make a mark on paper with the pen to see how the color will turn out before coloring my image (you will see this in a later image.)
Then you will start coloring. I start with my lightest color. To get even coverage color in circles, the same as you would with Copics.
Then lay down your next color, here I am using a little darker blue to add shadow. Also note that I am only shading as if the sun were hiting her on the front, so the shading is on her backside, not any on the front of her pants or shirt. Also note that I laid down this color a bit wide, not quite half way, but not just on the image outline.
Don't worry at this point about harsh lines, after you lay down your last color you are going to go back over the part you just colored with your lightest color. The next picture (sorry it is blurry) is the addition of the darkets blue, in a very, very fine line.
Yes, this one is blurry too, (sorry), but this is what the final part of the pants will look like after you have added all three blues and blended the colors out a bit. You get some really nice depth, and this method give a blend almost as good as a Copic!
Below is an example of one of the ways I lay out the colors to see how they will look together. Either I draw lines like this or I have a scrap paper next to me and just color with the pens I want to use, seeing how they go together and seeing how they blend.
First layer of the shirt in green:
This is after I added the two sharpie greens and blended a bit:
Working on the hat, it is hard to see the two yellows in this picture (you will see at the end that I added a little bit of tan to make the shading stand out more) Note the scrap paper on the side, that is how I test my colors and keep them next to me for reference, and to check to make sure I am using the right marker.
This picture shows the buckets finished and the boots being worked on. I used two shades of grey for the bucket and three shades of purple for the boots. This picture shows the boots before I blended them.
Here is where I decided that the hat need more shadow and I added the tan. Also I have colored in the ground below her boots, and added a little shadow underneath her feet.
And here she is, already to be put on a card! I am not that great at using markers to color, and if I can get these results with these pens, anyone can do this!
Please let me know if you have any questions or comments. Also, if you try this and it works for you make sure to leave a comment and tell us what you liked/didn't like about this technique.
Have a wonderful day tomorrow. TGIF!
35 comments:
Neat!! couple of questions - I'm not real clear on the blending part. I know Copic has a blending marker and that is what people use to blend the colors. When you blended your colors, you just used the colored markers themselves to blend, right?
Also - what kind of card stock works best for coloring? When I've tried to color on some CS, the paper rips or shreds as you are coloring. :(
Thanks for the time you're taking to review my questions and thank you for the great tutorials - I just discovered your blog a week ago and have been coming back every day since I learn a great deal from it. Thanks!!!
What a great alternative to the Copics, like you I like them but not their price.
Hi G,
I just used the Bic colored marker to "blend"a. If you work with the markers like a copic, ie, place colors down quickly when the ink is still wet, the colors blend better.
The colors do tend to get darker with these markers (unlike the copics), but I have noticed when they dry they lighten up.
I would suggest trying to start with the lightest color possible, quickly laying down the other colors, then going back and blending with the lightest color.
Had no trouble with my cardstock, it is just what ever Office Depot carries in the 250 pack. This method did not rip the paper or shred it. Make sure you do not press the pen into the paper, ie, light touch when you are coloring.
And thanks for the nice words about my blog. Please let me know if there is a topic you would like me to cover.
Wow, THANKS for this tutorial! I love the look of Copics but haven't invested in them. I have the Bics sitting in my craft cupboard. I'm definitely going to try this technique!
Thank you very much for posting this. It is always great when we devise different ways of doing things. I found your link in the Cricut msgbds. TFS
I am SO glad I found this tutorial! I am just starting to dabble in coloring my images, and this is so encouraging. I spend way too much on the stamps, I really can't afford to go nuts on the Copics, too. Thanks a million! :)
this is an excellent 'tut'.
Thank you so much for doing this.
I like my sharpies, but have only used them for hard surfaces - dominoes, stones, etc.
Haven't wanted to invest in 'copics'. I have so many colouring elements.
What a great idea! I have copics but I am really not that great with my shading. You however have done a PERFECT job I am very impressed.
I really like reading all your tutorials. I need to take some time and just practice what you are teaching!
even though I got a good deal on my copics...I like how your colors blend...thanks so much for sharing this
Thank you so much for the tutorial..Can't wait to try it out.....Awesome coloring......
PattiM
(Pattie's passion)
I Scrap So All Moments Are Remembered!!!
Thank you!!!! I am a stampaholic but have not beeb real brave on the coloring. So now I will have to try it.
Stacey
I got a 24 set of the Bic mark-it markers at WM for $12 today. Can't wait to try this. Just wish I had a flesh tone marker.
Other blogs I've read that use Copics and other color mediums seeem to mention Palette Noir ink pads quite a bit - maybe they're the ones to use to stamp the image before coloring? Awesome tutorial - thank you!
Tutorial is great and I appreciate your sharing your talents. I am still confused about the blending... Are you saying that you use the blending marker that Copic sells?
Thanks, Millie
I went and bought a set of 5 markers to test out. I LOVE the results!! I didn't add shading or anything and LOVED the results! Thanks for posting this!!
Thanks for sharing this tutorial. I have this set of makers and I will have to try them out using this technique.
Thanks for sharing. I have those markers and I will be trying your technique. Great job teaching!
I love my copics, but love my prismacolors more. They are still kind of pricy, but do have a blending pen as well.
the only thing I can't do with my prisma's is remove the color from the paper like you can do with copics.
I also use regular old crayola markers too :) Just depends on what kind of color results you are looking for.
Thank you for sharing the tut!
Fantastic! Thanks so much for sharing your knowledge about this. What a great way to save money! :0)
thanks for putting this tut together ! i still cant seem to get the blending though....
you are NOT using a blending pen? (i havent been able to find one yet)...and you just blend with the lightest color.....pulling the dark into the pix with the light?
if true, does it ruin the light pen?
I nominated you to the "Love Your Blog Award!
Shirley
http://www.paperthreads.com/blog/shirleysdesigns/
Wow! thank you Shirley. I will be posting a thank you tomorrow on the blog...wow, you made a very difficult day turn into a nice day.
Love your blog
love your tut
but now I'm not loving the fact I just HAVE to go out today in the rain and buy some markers and try your technique
hugs
keep up doing what you do
it's great
hugs
me
Thanks for the tips - your sample is so nice. I also saw someone touch the darker marker tip to the lighter color (same color) tip to help blend and after coloring she would right on scrap to clean up the 2 markers.
Thanks for sharing this tutorial. I just got a large set of the Sharpie's and and wanted to use them with my stamps. Have you used Stazon when stamping your image? I have used Stazon with my pencils and gamsol and it does not bleed...new to the markers.
Thanks for all the wonderful tutorials, very very helpful.
Just wanted to say a big THANKS for this info! I saw your tutorial and went out this weekend and bought the BICs. 19.99, 10.00 rebate, so I got 36 colors for 10 bucks!! Much better than the $40 bucks I just spent on 8 Copics! and I like the results, I'm definitely going to play with my stamps this weekend and have your page saved in my favorites, so any new techniques with the BICs would be great!!!
Love the tutorial. One question though: You mention 'embossing liquid' and that you put it on your stamp before you dab your stamp on the ink pad - curious why?
Cathy
http://catricks-creations.blogspot.com/
Catrick said...
Love the tutorial. One question though: You mention 'embossing liquid' and that you put it on your stamp before you dab your stamp on the ink pad - curious why?
Hi Catrick,
I use the embossing liquid (or you can just stamp your stamp in versa mark or a embossing ink pad) so that the ink stays wetter longer, thus allowing the embossing powder to stick.
Hope that helps.
wow, thanks for the tutorial ;)
love it ;)
Am I blending challenged??? or what? Can't seem to get the colors to blend....any help for the blending challenged?
Am I blending challenged??? or what? Can't seem to get the colors to blend....any help for the blending challenged?
Try using a scratch piece of paper the same as what you are going to stamp on. take your markers and line them up in color familes, and then start with the lightest color you can, lay down the darker color, and quickly go over the two with the lighter color.
Practice, practice, practice : )
The drawback to the bics is that they do not have many "lighter" colors so be careful in how you choose to put one color next to the other.
Also, try watching the video I did as well, there you can watch the technique in action.
I just found your site and I needed this tutorial! I cannot afford the Copics so I bought a set of Bic's and Sharpies the other day and now I know what to do to use them. Thanks so much
Shalom! Evelyn Mondragon . payday loans
Bic Pens are important part of my life, because I'm familiar to it since my childhood. It makes me much more glad that today I distribute this Mighty Brand!
Well, I'll bet you will be surprised to see a comment over two years later! I just Googled how to use Bic Mark It's like copics and up your tutorial popped. Thanks so much for sharing you knowlege!
Post a Comment