






I do get around to making cards, here are a few from this week:

Butterfly is colored with Luminarte - Twinkling H2O's 
and then added Aleene's Paper Glaze
to the image.


Close up of the card, very easy!

Used two punches, one for the hearts and one for the flowers, paper is actually paint chips! I love that you get all of the various tones of a color on a paint chip, makes matching colors oh so easy (yes I have a stash of paint chips.)

Stamped a music sheet stamp on water color paper, embossed with white pearl embossing powder, then put Distress Inks 
on my craft sheet, then sprayed ink with a glimmer mist, put a piece of water color paper on the ink, and finally punched out the butterflies (Martha Stewart Punch, Classic Butterfly) . Added some Viva Decor Pearl to the butterflies.
. Added some Viva Decor Pearl to the butterflies. 
This one was fun to make, I really like the color combination (and need to remember that so I use it more!) In hindsight I think a black ribbon might have been better, may make the card again to see how that looks : ) The punch is the Martha Stewart Scallop 3 Dot Punch Around the Page Punch , really nice punch with lots of uses.
, really nice punch with lots of uses.
I am becoming more and more a fan of Clean and Simple (CAS) cards, love the look and also how easy they are to put together. Having said that, creating a CAS can sometimes be much harder than putting lots of layers and embellishments together : )
Given that my area is so small the tools I have a limited to those that are useful and also can (for the most part) serve multiple purposes. How many of us have tools that just sit because they are either too hard to use or just require too much work to use? Today we will explore some really great basic cutting tools that will make your crafting easier, as well as far less frustrating. Before that though, the 2012 Winter CHA starts tomorrow (our son's bday too), and there are tons more new products coming our way, here is a short list of sneak peaks for the week:

Pink Paislee Paper: Great new paper! And no, I am not ordering ANY paper until my "stash" is used, have wayyyyyy too much paper right now : )
Next week I will post updates and live blogging as I can find them, will also be updating on Facebook daily.
Finally, the TOOLS! So many tools to choose from, and how to pick what is best for your particular crafting needs? There are some very basic tools that I think every crafter should have, tools that end up being used all the time and are easy to use (complicated tools do NOT rank highly in my book).
So here is a short list (with links for purchasing: please note that I am in the Amazon referral program, if you click on the links below and make a purchase I receive compensation. Given that I am currently unemployed I am hoping to supplement our household income through this program. If you are an Amazon Prime member you receive free shipping on most items, and I have tried to find good prices on the items linked.) and explanations of why I think these are must have tools to make your crafting easier:
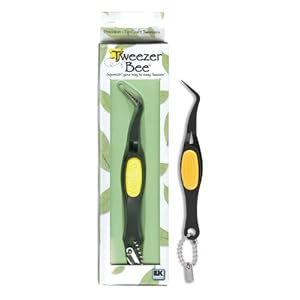 Ek Success 5 Inch Tweezer Bee
 : I use these ALL the time, for so many things, and love the design of these particular tweezers. These are non stick, use reverse grip (they stay closed until you open them up rather then you having to hold them closed) and have a very fine (and sharp) tip. These tweezers also come with a small looped chain so you can hang them up near your craft area which makes storage easy, and finding them easy as well. While these tweezers are not "cutting" tools, I had to include these as they are a basic must have for crafting.
 PERFECT LAYERS - Perfect Paper Crafting
 : I just bought these and wonder why I did not buy them sooner. My layers are so much more even now, and this tool is very easy to use. Nothing bothers me more than working on a card image only to try to layer some paper and end up with uneven and messy looking layers. Critical to using the Perfect Layers are two other must have tools, see below.
  Martha Stewart Craft Knife
 : I have had many craft knives over the years, this is by far the easiest and best one to use. The protective cover fits nicely on the knife when you are cutting, and goes back on the tip easily after you are finished. I find myself using this knife a great deal more then I used to use my old knives. Don't forget that when using a craft knife you want to make sure you keep a sharp blade, keep replacement blades on hand. (There is a GREAT deal right now on Crafty Steals for all a great collection of Martha Stewart tools, but the "steal" is only good for January 28th).
 12x12-Inch Self Healing Mat
 : Again, a must have for cutting with your craft knife and using the perfect layer tool. I also use the mat to make sure cuts I do on my paper trimmer are square. Along with this self healing mat consider getting a glass cutting surface as well (for using circle cutters and other types of cutting devices).
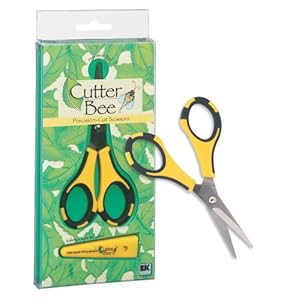
Scissors: I have too many scissors, especially when just two of them are used all the time. Don't scrimp on your scissors! The two that I use all the time are the Cutter Bee Precision-Cut Scissors
 and Tonic Studios Tim Holtz Non Stick Micro Serrated Snips
 . The Cutter Bee scissors are a must have for cutting out your stamped images, and the Tim Holtz scissors are fantastic for everything else! Ribbon cuts like a dream with either of these, and the Tim Holtz scissors are also very good at cutting through thicker items.
Paper Trimmer: You can get many different types of trimmers, rotary blade, straight blade, or a guillotine type of trimmer. There is a great discussion on types of trimmers on SplitCoastStampers, many people recommending the Genesis Trimmer.....however be prepared for sticker shock, while it may be the best on the market, the price tag is just too much for my little budget.

I have many different trimmers, the best (in my opinion) in my collection is the Making Memories Rotary Trimmer, however it is bulky and I don't find that I use it as much as my other trimmers, and other people have noted problems with the trimmer as well. One option for those of us with limited space is to get the Tonic Studios Guillotine Paper Trimmer 12-Inch-by-6-Inch, which I am seriously considering at the moment. Nothing is more frustrating than to have uneven cuts, and why frustrate yourself if you can get a tool that will make your crafting easier?
which I am seriously considering at the moment. Nothing is more frustrating than to have uneven cuts, and why frustrate yourself if you can get a tool that will make your crafting easier?
Note that this is my list, and I would love to read what tools you have that you can't do without. This list is the result of my own personal experiences with purchases (some good, some bad).
I hope you have a wonderful week! Until next time, happy crafting : )



