

Showing posts with label organizing. Show all posts

Monday, December 28, 2009

New Year's Resolution: Time to get organized!

I hope that you had a wonderful Christmas with your family and friends.  Our Christmas was great, family both Christmas Eve and Christmas, lots of food, great conversations and an overall wonderful time.  My husbands father is staying with us for a few days (he lives with my husbands brother and his wife), and it is nice to have the time with him.   At 91 he is a bit slower then he used to be, but his mind is still very sharp and he is loving having all the bustle of our house around him (though I am sure he is going to be happy to go back to a more quiet house in a few days.)

Anyhow, time to talk stamping : )  This year I have decided that organizing my stamps is long over due.  Right now my stamps are stored in CD cases, but I ran out of cases (and room ) so many of my newer sets are still in their wrappers stored here and there (and sometimes who knows where).  And while I have started to index my stamps many times, I have never really finished the project, but this year things are going to be different.

First of all I am actually sorting my stamps and getting rid of any stamp I have not used, or used rarely.  So far I have about seven sets of stamps, and that is just the start.  One can have too much of a good thing, and I have too many stamps that I don't use (and have to wonder what I was thinking at the time I purchased them.)

Today I thought we could go over some ways to organize your stamps and other supplies, as well as discussing ways to identify how to purge some of the items you now have but do not use.  Ready?  Here we go:

1.)  One of the first things you should do this year is to sort through all of your stamps and supplies.  Identify the stamp sets and supplies that you rarely use (if at all) and put them aside for a few days.  My pile (and I just started this process yesterday) contains sets of stamps that are very small images, country looking stamps and some images that I know I will never use (if I haven't used them in two years when are they going to be used?).

After you have waited a few days, go back and look at the stamps and supplies you have set aside.  You will be able to determine if you really want to get rid of the stamps by now.  I have decided that clearing out old stamp sets I do not use will allow me to save some room for newer sets that I will use.

Now, this is the hard part.  After a few days go back through the stamp sets that you decided to keep and find some more stamps/supplies that you can either sell or give away.  This two step process works very well and will allow you to free up some space for newer sets and supplies and maybe even give you a bit more space in your stamping/crafting area.

Another hint: this is a good time to change your storage system as well.  I unmounted almost all of my stamps a while back and am SO glad that I did! Right now my stamps are stored in CD cases, and I am in the process of labeling the cases and color coding to match their category, ie, green will be floral stamps, brown will be trees and leaves and so on.

Here are some links to various storage systems (I am thinking some day of going to DVD cases, but right now that isn't in my budget)

The Angel Company: Uses CD cases, and has some good advice.

Here is a video:


Panels for unmounted stamps: Pretty good prices on these panels for three ring binders.

Large clear containers:  I think these are great, easy to use and store a fair amount of unmounted stamps.

Crafty Storage:  I have this site linked on the "best of" links and it is worth posting again, and again and again.  GREAT ideas on stamp and stamping supply storage.

2.) Now that you have sorted through your stuff, now is the time to index your stamps.  Yes, I know, this is a long process and it is boring, but it is also rewarding and will make your stamping time much more productive.

First, make sure your stamps are organized into categories, here are just a few categories you can start with:
  • Botanical (anything flower related)
  • Trees
  • Leaves
  • Hearts
  • Objects
  • Words/Sayings
  • Holidays
  • People
  • Flourishes
  • Shapes
You can also get ideas about what categories to use from a number of companies that sell stamps, simply look at the listings of their stamps to get ideas on what categories you might want to include in your list.  Remember, this is your list and you know what types of stamps you have so make your list work for you.

Once you have sorted your stamps out by category you need to decide how to index your stamps.  I have decided to stamp the images in each CD case on a 5 x 7 index card, write the name of the label on the card, color code the card (to match the color of the category) and put the cards on a binder ring so I can flip through them quickly.  (I will take a picture later today and update the post).  NOTE: You also should try to write down the manufacturer of the set you are indexing as well as when you purchased the set.

Two things:  You really need to have some sort of way to sort quickly through your stamps when you are working on a project and the best way I have found is to have your images stamped and indexed.  I did try a method where I stamped the images on large pieces of paper and put them in a binder, however I found that (for me anyway) it was harder looking through large sheets of images and I also had trouble updating the binder.

Using the 5 x 7 cards allows me to easily flip through my images and find what I need, also, when I get rid of a set all I have to do is find the card and throw it away. 

Now, the one thing that I am struggling with is how to index words/quotes contained within sets that have images.  What I might do is index everything by set first, and then the sets that contain words will get a second colored dot as well.  For instance, if a botanical set has flowers and a quote or word then I will give that stamp a "green" dot for botanical and then another color for words/quotes.

NOTE: many images fall into more then one category, trees can be "trees" but they can also be "Christmas/Holiday."  Cross indexing (stamping images for more then one category) is really the best way to find what you need, but it does take more time.  Instead of overwhelming yourself, start with a simple index of everything you have, and eventually you can take the time to stamp your images a second and third time for other categories.  The most important thing is to get your images indexed at least once. 

Eventually I will create an index for all of my sets that will have images stamped into more then one category, for now I want to at get the sets indexed (which means stamping every image I have) at least once.  Let me explain:  if you have a floral set that also contains words and or quotes you should stamp the entire set and index as "floral" and then stamp the words/quotes and index them in your "words/quotes" category.  By stamping images more then once you will find that you can quickly access whatever you need, whether it is an image or a word/quote.  Again, I will post pictures later today or tomorrow of exactly what I mean.

Here is a link on SCS that discusses all sorts of ways people have indexed their stamps, and there are also a number of indexing forms you can download. Remember you need to find a system that works best for you!  What works best for you is going to be something that you know is easy for you to update, change and use all the time. I have tried the three ring binder method and it does not work for me, thus my index card solution : )

3.) After you get your stamps organized, don't forget about your other supplies.  Now is a GREAT time to get rid of anything you haven't used in the last year (you want to make room for some of that new stuff you know you will purchase this year).  Go through your ink pads, pens, paper, embellishments, glue, stickers and get rid of anything that has been sitting there unused.  You can list them for sale on Ebay, hold a garage sale, give away to your friends, hold a "swap" with other stamping friends (everyone brings their unused stuff and swaps for things they will use), donate your supplies to a local school or church, just make sure to clear out what you don't use! 

I have a number of supplies I don't use, so this year I am going to sort through ALL of my supplies and pare down to the things used on a regular basis: copics, watercolors, H20's, chalks (do I really need eight different sets of chalks?).

4.)  Last, but not least, make sure you use what you have this year!  Instead of buying more paper (which you have to store), use up what you have and then get more paper.  I have far too much 12 x 12 designer paper, if it isn't getting used this year it is going to be sold/donated to make way for paper I will use next year. 

Now I know it is hard to not buy "new" stuff, but given our current economy why buy more of what you already have?  Save your money for new supplies that you don't have instead of adding to your stash of supplies that lead to frustration.

Ok, so this is the year to get organized!  If you have any good ideas for organization, please post in the comments section, we all want to see your ideas!

I hope this post has inspired you to make 2010 the "organized" year : )

Have a great day!  Remember, I will post some pictures later today (or this week) of other storage ideas and my stamp indexing system.

Wednesday, August 20, 2008

The "living" craft room/area

I have discovered that my craft/stamp area is a "living" thing. What do I mean by that? Well, for instance, it never really stops changing : ) While I have not increased the amount of space I have, my storage has almost doubled through a few simple changes.

This all leads to that never ending quest for stampers to get organized. So I thought tonight I would share some organizing hints that I find helpful. Remember that we all have our own style, and what may work for me won't work for you, but you might get an idea on how to change what I do to work for you.

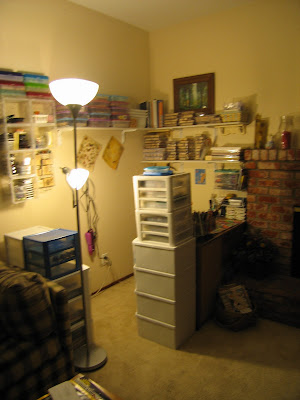
As you know my crafting area is very, very small, in a corner of our family room. This is what it looked like a few months ago:


Note that you can still see some walls in that picture. Fast forward to today, and well, the walls have almost disappeared.

When we got back from vacation I took a few days and unmounted most of my stamps, still have a few to do, and will finish maybe this weekend. I can't believe how much room I have now! And I cheated on the unmounting. I did not use the ez-mount, just took the stamps off the wood block and kept whatever backing was on the stamp on the stamp and stuck the stamp in a CD case.

Anyhow, I bought a small electronic machine to do labels for the CD cases (I tried to write on the cases, it really didn't work, and truthfully I didn't want to cut strips of paper for hours and hours). The machine isn't that expensive, but boy oh boy, the tape is! I made a huge mistake by purchasing tape at a local office supply store, at $18 a roll for 3/8th of an inch wide. Of course when I came home I immediately looked online and found the same tape for $8 less, and then I figured that 1/4 inch would work just fine, and that was $10 a roll cheaper! I purchased three rolls at ECom Office Supplies, and they shipped the order today. Don't, what ever you do, DO NOT buy the tape at Office Max, Staples or Office Depot.

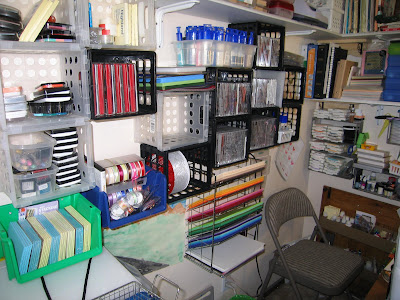
So, what has changed in my little area? I have used more of the wall space for storage, and it has really made life ohhhhhhhhhh so much eaiser! First of all, almost all of my storage stuff is purchased at the dollar store. The crates you see in the picture below are an example, I just screwed them to the wall, and they are the perfect size to hold the CD cases filled with stamps.


If you decide to unmount your stamps, I highly suggest either the CD or DVD cases, I tried storing them in binders, that just didn't work for me, and if you do the CD case invest in the labeling machine. You can see some of the CD cases that I have started to label in this picture, and all I have left to unmount is on the top shelf.

Also, in the picture above I have my letter sized cardstock on a file holder that I screwed to the wall. Costco had the file holder for $14.00, and it has been a HUGE help! I used to have my paper stacked on the shelf and in the desk, but it was always hard to pull out the right color paper, this holder holds at least half of my card stock, and I can easily access what I need.


I am also using the crates to store some large die cuts that I use in the CuttleBug, as well as other odds and ends. You might also notice that I screwed another type of storage container to the wall, those little bin things that stack.

One of the things about organizing a craft space is to try to get what you use most nearest to you, and also to have it organized, easy to pull out, easy to put right back. That is what I have tried to do in my little area.

Here is a picture of what the area looks like when you are sitting in the chair, directly in front:


To the right a bit:


To the left:


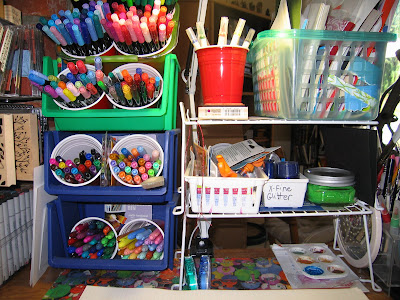
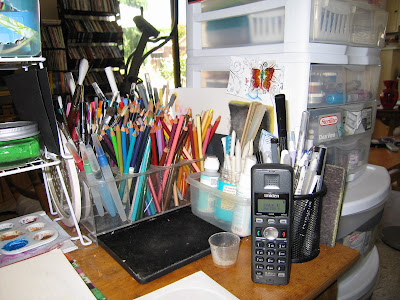
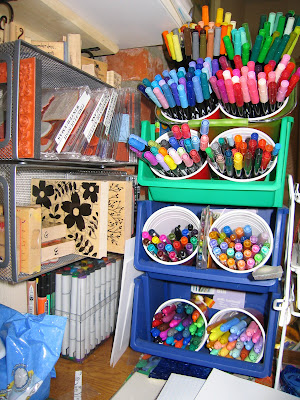
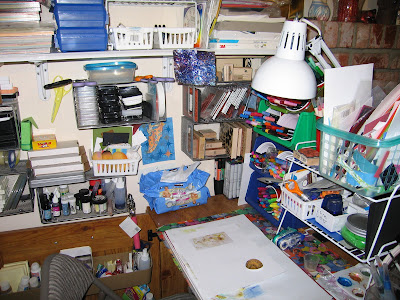
At my fingertips I have all of my water based markers, bic and sharpie markers (I use plastic cups to separate them and hold the pens at an angle in the bins), exacto knives, sharpeners, oderless mineral spirits, colored pencils, scrubber, stamp clearner, adhesive, stumps to blend with OMS, my bone folder is there with the markers, the white box that says glitter has sharpeners in it (have to re label that), and I have a basket for my scraps (they do add up quick don't they!). Also, tucked away are prisma markers and copics, can you find them? (Remember find Waldo?) Also have baby wipes there, and then some larger stamps and some sets in the CD cases, and some stamps that I love and most likely won't unmount. The metal boxes were purchased at Target, a bit expensive, but they have magnets on the top and I use the magnets to hold my scissors in place : )


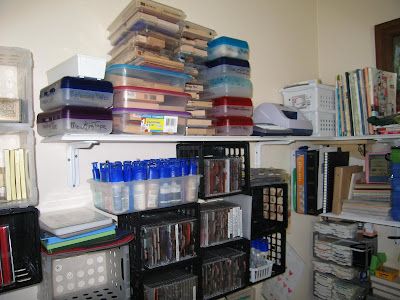
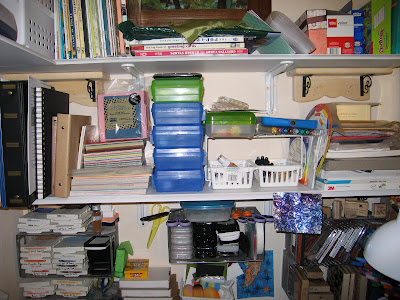
The picture above shows the wall and shelves on the left side of my work area, here I store all of the ink pads I use the most, versamark and the staz on, scissors on top of those cases, a box with some sponges that I use, and next to this stuff are the SU ink pads, distressed ink pads, stamping spots, and on the shelf are Twinkling H20's (blue boxes), some prima flowers, some new shimmer paints (green box), alcohol inks, paint daubers, and some paper. Below the wall, right next to my leg is:


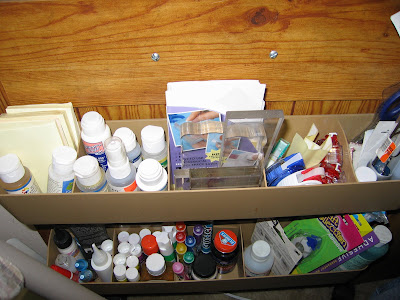
Embossing fluid, liquid glue, glue sticks, more adhesive,acrylic mounts, some liquid glass, and other odds and ends, on the metal shelf I have some DYI glimmer mist and various gitters.

Here is a bigger shot this area:


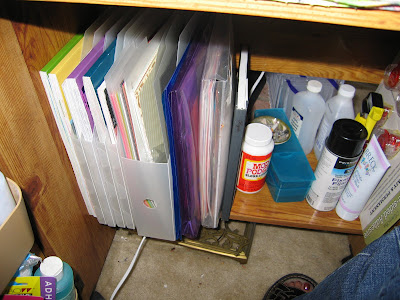
The white and blue plastic drawers hold 12 by 12 paper, embossing powders, mica powders, brayers, punches, chalks, water color paints, embellishments like eyelets/brads, stickers, and some other odds and ends. Also, I use the underside of my desk as well, have some more 12 x 12 card stock there, and also some other things I use:


And on the floor, behind me when I am sitting, is my cuttlebug and scorpal (the plates, brass stencils, embossing folders and die cuts for the cuttle bug are on the shelves right above).

I keep my personal trimmers on top of the white drawers to my right, my heat gun on the wall behind me.

The point is that there are many, many ways for you to store your crafting supplies, and just because you store them one way now doesn't mean you have to continue with the same system. Even in a small area like mine you can find ways to make your crafting a much more organized and fun experience!

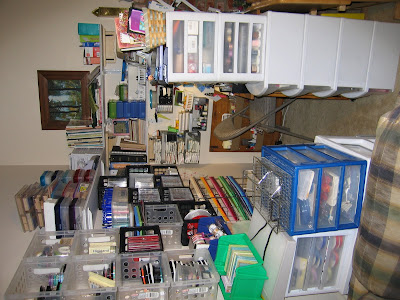
Here is a shot of the whole area:


Remember, you don't need to spend thousands of dollars to create a really fun crafting niche, all you really need is some imagination, a little elbow grease and the flexibility to keep changing things until they work for you. And, if like me, you don't have your own room, be creative! Find a way to steal a corner or a small space in a room. I am also thinking of getting some type of a screen to enclose the area a bit more, that way people will see the screen in the room, but not my craft area.

Hope you liked the post tonight, if you have any organizing questions please post them and if I can't answer, hopefully someone else can.

Darn, forgot a link, here is a neat blog about scrapbook organizing, and I will post some more sites in the near future. Also, I haven't forgotten about the ATC swap, look for some information early next week.

Wednesday, July 23, 2008

Organization: Or how to rubber stamp and not lose your mind : )

When I stamp, everything, and I mean EVERYTHING, ends up right in front of me. Markers, adhesive, all sorts of paper, glitter, glitter pens, water brushes, Niji paints, chalks, personal trimmer, oh, and stamps, usually lots of stamps. So how does one organize all that "stuff" to make it easier to not only find, use, but to also put away?

Tonight we are going to travel to the world of organization. Now, organizing doesn't have to be hard, and once you get organized, if you put things away you will stay organized. What are some of the finer points of organizing your crafting supplies?

First of all you want to end up with a room or area that has areas for your supplies, specific areas. Your stamps should be in one place, your paper in another, chalks, paints, brushes, markers, all stored together separately.

So, what do you do if you have a craft room or stamping area that is just a mess. Start by doing ONE thing to organize. That one thing might be to just gather all the paper together, and then you go onto the next thing, maybe piling all of your stamps in one place. Continue to do this until you have all of your supplies grouped in piles. Don't think you have to do this all in one day, take your time, each day tackle one element, and then do something else the next day.

After you have sorted out your supplies, start to envision what you use the most. I use my scissors, adhesive, personal trimmer, paper, stamps, certain ink pads (Versa Mark, Staz On, some SU the most), glitter pen, Bic Mark Its, regular markers, twinkling h20's, chalks, colored pencils, gamsol, and a few other things. These things are stored so I can easily reach for them when stamping, and they can quickly be put away.

Figure out what things you use the most, and store those nearest to you, because they will end up there anyway : )

For storage, be creative! Today I bought a basket at the dollar store to store my regular markers. I separated the markers into groups of colors, put them in plastic cups, then put the cups in the basket, which is on my work area where I can get to it without leaving my chair.

Also, don't forget that your walls can be GREAT storage, I bought some metal CD holders, nailed them to the wall, and put my ink pads, unmounted stamps (stored in CD cases) and a few other things in them, they are easily accessed when I am stamping, and when I am done it is very easy, and quick, to put the things back.

Here are some really neat links about organization and craft storage. Remember that it takes time to figure out what method will work for you, and what works for me may not work for you.

  • Love To Know: Check out how they turned a CD cabinet into stamping storage! And there are some other really good tips at this link as well.
  • Scrapjazz: Even though this is a scrapbook themed link, you are going to love how much information you will find here, and though this is only a preview of the complete book (which you can purchase online) you will still find a few things to help you get organized.
  • Crafty Storage: (Also on the "best of lists" to the left) The granddaddy of all links for organizing your craft areas. Check out all of her GREAT links to organizing, I love her site and have spent literally hours on her site, clicking her links and drooling over all the great craft rooms.
Hopefully these links will help you get started with your organizing. And remember, you don't have to do it all at one time! Make an action plan, and above all at least try to do one organizational thing a day and before you know it your craft area will be award winning!

Have a great rest of the evening, and an even better Thursday.
Blog Widget by LinkWithin