







 AfterHoursStamper was featured on a blog called Be @ Home Decor Blog as a Best of the Web! I am very honored to have them feature my little blog, and if you get a chance check out the other links on their Best of the Web, lots of cool sites and great information such as their "Tip Center" which provides some good tips on various topics.
 We have been working in our yard and finally built a raise bed for our vegetable garden, now we need to get some manure and other things to fill the bed and then the plants! Our plan is to do what is called Square Foot Gardening
 You grid off your planter into one foot squares and plant within those squares which will give you higher yields with a lot less room. I will take pictures as soon as we get the plants in : )
Enough of the small talk, lets get down to business : ) This week is all about coloring, from copics to water coloring and more. I tend to color my images a variety of ways: colored pencils, water coloring, copic/alcohol markers, ink, dye based markers, chalk, and so on. Each coloring technique has its pros and cons, some are easier to learn, some require special paper, some require expensive coloring supplies, all of these technique give you a different look to your stamped image or background.
All of the links today are about coloring mediums and also how to color your images using various mediums. In no way is this list complete (it seems like every week there is a new product you can use to color images) but it will hopefully give you the inspiration to try some new coloring techniques with the supplies you already have on hand.
 Before we get to the coloring there is one important facet to review. Any of these coloring techniques are going to look best if you make sure to create dimension in your coloring. To create dimension you need to make sure to add shading to your image (darker areas) as well as make sure to leave some white/light areas. Here is a very good link that goes over basic shading (and also has links to a number of coloring mediums).
 Also, you should try to add some outline color/grounding to your image. Add a light shade of color around the image for added depth. Don't leave your image "floating" on the page, "ground" by adding a "floor" to the image directly underneath. All you need to do is add a swatch of color, green, brown, even grey, to give your image something to stand on (grounding).
If you are coloring an image and do not like what you see, take a moment to ask yourself how your shading is. Are there dark and light areas? Is the blending smooth? Do you have a light source so that your shading makes sense? Is your image grounded? Do you have shading around your image? If you don't like what you see try to darken areas, or add some white to the image (it is usually easier to go darker than it is to make your image lighter).
And remember that practice makes perfect. You might sit down and color images and not like one that you did, however if you keep on practicing, reading tutorials, watching videos, your coloring will improve. Set aside some time just to practice, stamp out one image a number of times and play with your coloring, vary the light source, vary the intensity of your coloring. I promise that if you do set time aside to practice you will improve!

Copic or Alcohol Markers: I enjoy using my Copic markers, however these markers have become extremely expensive. There are alternatives to Copic markers, such as the Spectrum Noir

pens, but the alternatives are not quite the same quality as the Copics. Having said that, the price difference between the Spectrum Noir
(depending on the set you buy you can get these for as low as $1.54 per pen) versus the Copics ($5.24 for the Sketch and $3.59 for the Ciao) makes it hard not to at least try the Spectrum Noir (which I am planning on doing in the near future and will have a product comparison for you as well).
Once you have alcohol markers you will discover that there is a learning curve with these pens, and it is critical that you use the right paper and stamping ink (I have posted on these two items before). Once you have the right paper and stamping ink you will need to practice, practice, practice to be able to get flawless blending.

Here is a GREAT tutorial (with a free digital image) from Dove Arts Studio on how to color using your alcohol markers, and yes, I am planning on printing out the image and following the tutorial as well (remember that when you print out an image to color you need to make sure your printer ink is dry or you will have bleeding from the printer ink).

Dove Art Studio also has a very good starter list of copics, really like how she put the colors together on a chart.

And how about a free chart for coloring hair and skin with your alcohol markers? Loved this, and it is VERY handy to have (always write down the combinations you use so you can duplicate your work).
You will need to create an account (free), but the chart is well worth the few minutes it takes to sign up.
Don't forget that you can also search for all sorts of copic coloring on Pinterest.
One more resource link, lots of information here to savor and enjoy.
 Colored Pencils: Using colored pencils can be a great way to quickly color your images with wonderful results. Most of you are aware of using your colored pencils with Odorless Mineral Spirits (OMS), an easy technique that gives some very good results. Colored pencils are cheaper than alcohol markers which means you can afford to buy more colors! There are many different brands of colored pencils, some are wax based and some are oil based. The oil based pencils, in my opinion, are much easier to use because you don't get what is called "wax bloom" from the wax based pencils. I use the Faber-Castell Polychromos
  and absolutely LOVE the way these color.
 Colored Pencil Resource: This link has TONS of information on using colored pencils (I have linked here before). You will find basic to advanced techniques here, as well as tutorials and videos, just an overall great resource to have.
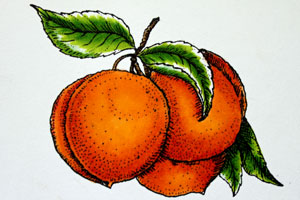
Don't forget that you can combine colored pencils with your alcohol markers ( you add the colored pencil after you are done with your markers, NEVER go over colored pencils with your markers, this will ruin your markers.)
Dye Based Markers: These markers are dye based and water soluble which means you can lay color down and then work the color with water (a water brush or paint brush dipped in water). You can also color your stamps directly with dye based markers, or you can color your image without using water.
If you plan on using water the best way to use these markers is on water color paper, 140 pound is preferred (you will find your ink blends much better on 140 lb versus 90 or 120 lb). You can also use your dye based marker to create a paint pallet, simply scribble some color on a nonporous surface (craft mat or cd cover, etc.) and than pick up the color with a paint brush and add directly to your image.
There are many different manufacturers of dye based markers, my favorites are Tombow and Memento. Tim Holtz has the new Distress Ink Markers (I have two and haven't used them yet).
Here are two good videos on coloring directly on paper with dye based markers:
You can also watch videos by Stamps by Judith to see how to color your images without having to use water.
Water color/ink pencils: Another great way to color your images. You can buy water color crayons, pencils and another product called "Inktense" (this is a ink based rather than water color product). I use both and love the Inkense. When using the Inktense you need to remember that when the color dries you will not be able to re-wet and move the color around as the pencils are ink and when they dry the color is permanent.
You can use water color pencils to color directly onto your image, or you can use a wet brush or blender pen to pick up the paint from the pencil and than lay the color down on your project. Either way you will get some wonderful results. Again, make sure that you use at least 140 lb paper for the best results.
Here is a nice tutorial on using water color pencils.
Dye based ink pads: Yes, you can also use these to color your images. All you need to do is get some of the ink onto a nonporous surface and than pick up the color with a water brush or blender pen and color like you would using any water color medium.
Chalk: Again, another versatile way to color your images (and also use on solid images). You can color your image directly, you can stamp a solid image in versamark and apply chalk over the image, you can stamp on dark paper and color with the chalks, you can use a blender solution to help the chalk blend or you can do a "double" chalk method by coloring your paper with chalk, stamping an image with versamark, and then applying more chalk!
Chalking is also a great way to color images you emboss with brass stencils. After you have embossed (or you can just use the brass stencil to color without embossing), keep the brass stencil in place and color using your chalk. You will get some wonderful results! Here is a link to chalking techniques from SplitCoastStampers .
And here is a nice video on coloring directly to an image using chalks:
Whew! And as I said before, this is not a complete list of ways you can color your images (we didn't even go over using gel pens, crayons, glitter, you get the idea). Hopefully you will try something new, or pull out some supplies you haven't used in a while to color your images.
Have a great weekend!


